Photographer’s Guide To SEO
 Today it’s my turn to help you with your photography website business by listing my personal SEO tips. I follow a set of rules, sort of a “guide” that helps increase traffic to my photo websites.
Plus, I’ll show you a real life example on how I got over 10,000 social shares in just ONE of my articles (tip #10), then I”ll share my secret so you can do the same!
From wedding to stock photographers, knowing how to successfully showcase your work online is essential. There are tons of tutorials about how to build a photography site, but who ever covers optimizing specifically targeted towards a photography site?
Well, there’s one now!
First, know that the main way to do this is by having your own website. I’m assuming you already have one or about to start one soon.
I’ll start with the basics then move on to more advanced tips.
#1 Own Your Domain Name
Most profitable photographers own their domain name. In our case outletphotography.com, is purchased and operated by us. Having our own domain name allows us to control our online “brand”. And having an online brand that connects our website to our YouTube channel, Facebook Page, etc. helps us rank better for keyword terms related to photography in the search engine results.
When you own your own site, it also shows your clients that you’re more than just a hobby photographer, it tells them you’re serious about your profession. But what does this have to do about search engine results you ask? It helps build your social followers on Facebook, Twitter, etc. Followers that you’ll later to grow your business. We’ll talk about this on tip #10.
So how much does your own domain cost? About $12-$15 a year. As you can see, for most serious photographers the price isn’t even a factor.
This also means that hosting your own site has a better SEO factor than going the cheap and free way. I personally use Hostgator for outletphotography and all of my sites.
#2 Your Website Platform Can Affect Your Ranking
It’s no secrete that Google loves WordPress, so it’s also no surprise that many of the sites are now using it. But lets get something correct, I am referring to WordPress.org not WordPress.com. What is the difference? Well, the latter is a free site that hosts your site as a sub-domain. And WordPress.org is a free software that you download from and onto your hosting account.
The WordPress code is very search engine friendly, plus it’s the only one that you can easily add a free “plugin” to boost your site’s ranking. I’ll get into that later.
Another reason it can affect your sites ranking is that it’s easier to update. As a photographer I don’t want to spend the majority of the time working on a website, I have shoots to do, images to edit and clients to see. Search engines like sites that are updated frequently, so for busy people WordPress makes this task very easy.
Plus, there are many free “themes” that are specifically designed for photographers. You add these themes after you install WordPress.
Never use an all Flash website, this is a killer. I see so many “cool looking” flash sites that photographers have been sold into, but when it comes to search engine results, those built on flash always suffer.
#3 Properly Name and Optimize Images
So everyone loves your photos and you get lots of compliments from your clients. Posting them on your site is a no-brainer, but how can you help the search engines “see” your images?
Search engines don’t have eyes, they only read text and need a little help from you. Make sure to always do at minimum these two tasks to any photo you upload to your website.
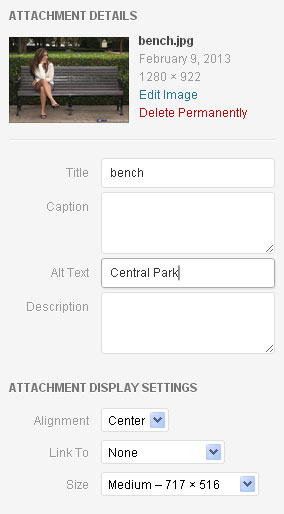
- Always name your images.If it’s a photo of a Central Park bench, then name it bench.jpg
- Then use the “alt” attribute feature in WordPress to further inform the search engines that it’s in “Central Park”.
The worst thing a photographer can do is upload an image with it’s default camera file name, such as DSC-874.jpg. This does nothing to drive traffic to your site. This comes directly from the Google Images team.
WordPress includes two other areas where you can help the viewer and search engines get a better idea of the photo. There is a Caption and Description area, I see these as optional and not as necessary as the first two.
Since we are talking about images, remember to use the feature in Photoshop to optimize your images for online use. PS has a “Save For Web & Devices”, use it and try to keep your file sizes small. But remember, a smaller file size can degrade your image so use it carefully.
Unlike most sites that tend to show under 100 K files, photography websites need to go a little higher, so it’s OK to upload 300 KB to 400 KB file images.
Note that uploading too many large files will slow your page load time and negatively affect your sites position on the SERP’s. Look at my last tip on this article for a way to test the speed load time of any web page.
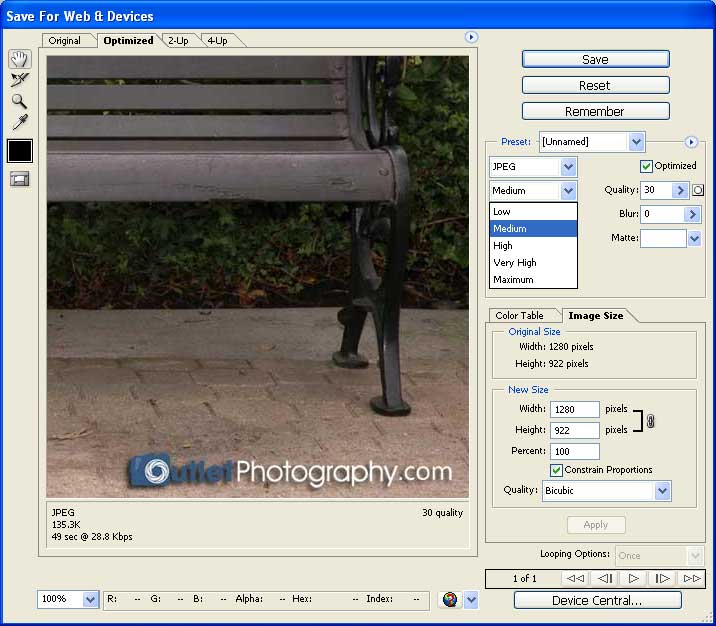
Remember, file size and image size are two different things. I’m referring to file size above.
In addition, use the WordPress option called “Featured Image” when creating a post/article on your site. Whenever an article is shared on a social site like Facebook, it looks for the main image. By assigning this on your end, you choose which picture will be shown as a thumbnail on any social site that shares your post.
#4 Article Size, Structure, And Content Matter
Whether it’s a wedding or portrait photography site, there needs to be more than just great pictures. A photo or a group of photos should be accompanied by a story describing it. Maybe it’s a sample of your wedding portfolio or a recent shoot that you want to highlight. Make sure you write about it on the same page your images are shown.
For an article to get indexed and ranked properly by the search engines, make sure to do this:
- Write a minimum of 450 to 600 words. More is better but only if it improves your article.
- Make sure it’s original text, don’t copy from other websites.
- Use good grammar. This makes the visitor and Google happy.
- Insert your main keyword into your first paragraph sentence.
- Insert your main keyword into your last paragraph.
- Use synonyms rather than keyword stuffing. (repeating the same keywords)
- Limit the use of anchor text on links to about 50%.
- Use H2 and H3 tags to break up your article into sections.
- Each paragraph should be no more than two or three sentences. (Easier to read)
- Create a video or graph to enhance your article.
To expand on number 7 above, anchor text is when a specific word or phrase is clickable in a sentence and leads to another page or site. In the past the rule was to always do it this way. However, due to Google’s constantly changing Panda algorithm, if you have a lot of links (which can be bad as well) and all are with anchor links, it may look like keyword stuffing. So try to mix it up by using “here” or “site” as the clickable word.
The most important thing to remember is that great content is king and a good user experience translates to more visitors to your page. Only share your best photos, along with your best stories about them.
If you’re showcasing a series of wedding photos, then add a great story behind it. Make sure it’s written correctly, use spell check and proof read for grammatical errors. And finally, make sure it meets the first recommendation above for length.
#5 Link Juice Is Real
Once a search engine indexes an article and ranks it for a particular keyword phrase, it takes it’s place on the search results. In order to keep your place in that spot, Google will try to determine if it’s an authoritative site for that subject matter. It does this in several ways, one of them is to look at the links in that article and where they lead.
The “importance” of your page can flow out of your article if it has links to other sites. There is a way to let the search engines know that you don’t want any of your “link juice” for that page to follow out of your article from a specific hyperlink. To do this add a “nofollow” rule to your link or site.
WordPress by default already adds this to the comment section, but inside your article it’s up to you to do it manually or with a plugin. I prefer to do it manually by hitting the tab called “text” when I’m writing my WordPress post in the back-end.
Next to the link I created, I add the following:
rel=”nofollow”
![]()
And that’s it! I do this for any hyperlink that leads out of my website onto someone else’s site that I don’t run. This is one of the more important things you can do for your photography blog or website.
Since I’m on the subject of links on a site, I want to add that backlinks (sites linking to yours) are one of the most important ways for your site or any article to rank high on the search results. However, they’re only important if they come from authoritative sites that relate to your website niche.
For example, a wedding photography site based in Santa Barbara California gets a backlink from a website that talks about the hobby “metal detecting” in Florida. A link like this has no value. But one from a Santa Barbara wedding bridal shop will count in a positive way. Even if it’s a “nofollow” link.
Also, having too many unrelated backlinks can hurt your site. So never pay for them, they are useless. Instead, create honest informative articles with awesome photos you’ve taken and the backlinks will naturally occur.
#6 Best WordPress SEO Plugins for Photographers
For photographers who use WordPress, these are my recommendations to use as plugins:
- All in One SEO Pack – Free and easy to use. Yoast’s WordPress SEO is a competitor and works just as good.
- Google XML Sitemaps – Creates an XML sitemap so you can submit it to Google Webmasters.
- Google XML Sitemap for Images – Creates a separate XML sitemap for images.
- NextGEN Gallery – Allows you to manage your photos and galleries on your site.
- Table of Contents Creator – Creates a table of contents page on your site.
- W3 Total Cache – Helps your site load faster for a better user experience.
- WP-PageNavi – Easier to navigate your site.
- Social Media Widget – Adds a side widget to add links to your various social sites.
- ShareThis – Adds social site buttons so people can share your articles and photos.
- Outbrain – Adds thumbnail recommendations of other articles in your site at the bottom of each article.
- Akismet – Helps eliminate spam comments and emails.
- Contact Form 7 – Easily allows you to add a contact form.
With the exception of Outbrain, all of the plugins above can be found in your WordPress plugin search section on your website.
#7 Google Webmaster Tools & Analytics
One of the most important things photographers need to do with their website is to register them at Google Webmaster Tools (GWT) and Google Analytics (GA). Both are free to use and provide some of the most useful information for any website to succeed.
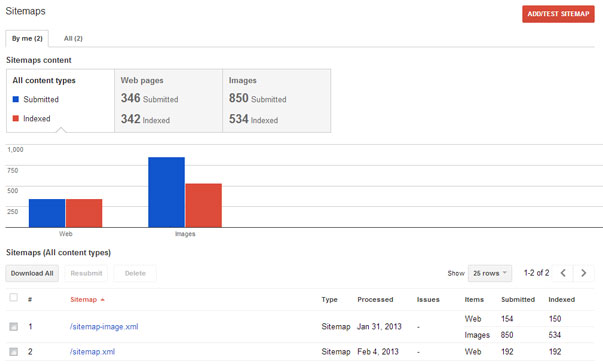
GWT is where you upload your XML Sitemaps, which helps Google crawl your site’s pages and images. It’s a one time task on your side, but the XML plugin I mention above keeps updating each time you change your website. Plus it “pings” the search engines, letting them know you have new pages up and it should be crawled again.
That’s just one of the benefits, there are too many to mention, but trust me they’re important.
At GA, you’ll learn more about your visitors. Which in turn helps you create a better photography website.
#8 User-Friendly URLs
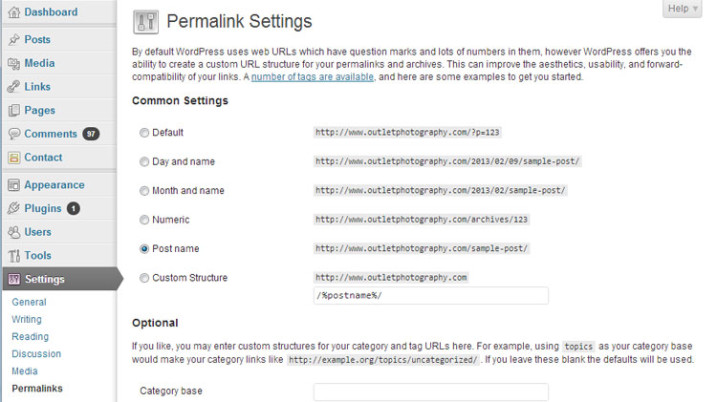
Just like your images, a photography website’s urls should include names, not numbers or other crazy characters. The default urls of WordPress sites look like this:
http://yoursite.com/?p=123
But should look like this:
http://www.yoursite.com/photographers-guide-to-seo
You can change this on your WordPress Settings > Permalinks and choosing the Post-Name option.
#9 Page Load Speed
One of the main problems that plague photography sites is page load speed. Photographers love to show their images in large formats, but then suffer the consequences of slower page loads due to so many or larger file images.
Test your page load speed with Pingdom’s speed test tool.

If your website page loads too slow according to this test, then look at ways to speed it up by reducing the size of your images or enabling the W3 Total Cache plugin I mentioned earlier.
#10 Publish It, Then Share It
There are so many great images, photography articles, reviews and tips online but unfortunately many are buried deep in the search results for no one to see. It seems only handful get the views and the rest of them are lost and wasted. But there is something you can do about it.
Each article, page or gallery I publish gets a little help from me in the beginning. Right after I publish it, I post it on it’s official Facebook Page, in addition to my personal account. I use Twitter and Google+, and finally one of the most best ways (and least talked about) to get quick visitors to a page is to use StumbleUpon.
StumbleUpon has worked so good for me than I’ve had one particular article get over 11,000 total shares! My Nikon Back Focus Fix page was originally shared on StumbleUpon and now has over 1000 shares on Facebook and over 11K total shares. “Shares” are only a small % of the actual people who read the article, it has been read over 500,000 times! Now that’s what I call a “nudge”!
This also works for videos you post on YouTube, my Photoshop Airbrush Tutorial video has received over 27,000 views by sharing it once on StumbleUpon. Everyone shares things on Facebook, but most overlook StumbleUpon. Don’t make this mistake.
If you created a good article/photo gallery, this little nudge can quickly turn it into one of your most popular pages.
This also assists your article in getting indexed faster by the search engines. So don’t just hit publish and wait for people to see your photos or articles, get it out in front of them right away!
Final Thoughts
Finally, it may seem like a lot of work, but if you use it as a guide and make the additions/changes to your photography website you’ll see that the SERP for it will improve. It’s always a “work in progress” job. I’ve been doing this for many years now with great success and I know it works.
I hope this information has been helpful. If you have any questions, feel free to ask with a comment below and I’ll try my best to help.
